Table of Contents
This section will be about the features of Gentics Mesh. Each will be described in detail including examples and references to relevant parts of the API or related tutorials.
Content Trees
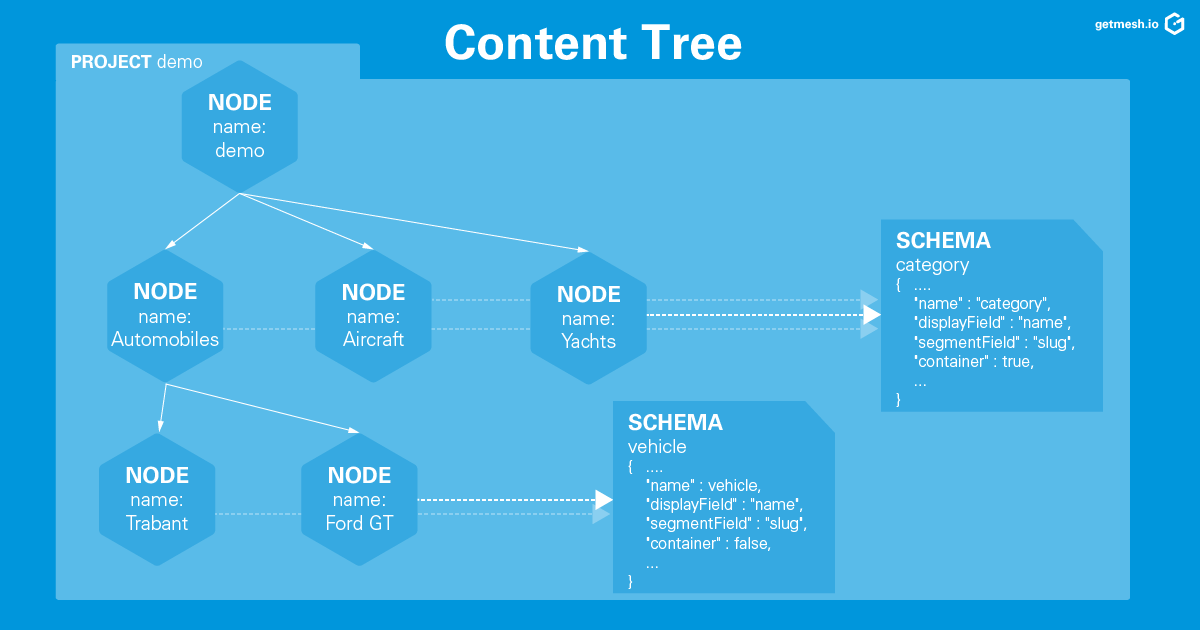
Gentics Mesh provides the means to organize your contents in terms of a content tree, or rather a node tree. Nodes can be hierarchically structured if a container schema is provided. For example, a book node can act as a container for chapter nodes. Alternatively, consider the example in our demo app, where vehicles are structured within categories.
While it is perfectly legitimate to organize your contents in a simple, flat structure with tagging and referencing, content trees come with big a bonus: they inherently allow for automatically generated hierarchical navigation menus, breadcrumbs and pretty URLs. This furthermore means routes are not hard-coded in your app but can be defined dynamically by content editors using the Gentics Mesh user interface.
| To get you started, Gentics Mesh is shipped with a generic folder schema allowing you to follow the well-known file system paradigm for hierarchically organizing your content in a tree. |
There are two properties when defining a schema for your nodes that are of importance in this respect.
-
container -
segmentField
Let us consider the following example on the basis of our demo app to demonstrate how these properties work together to support navigation menus, breadcrumbs and pretty URLs:
Within the demo project vehicles are organized in three different categories. The nodes Automobiles, Aircrafts and Yachts of type category serve as containers for nodes of type vehicle, e.g., the node Ford GT in category Automobiles.
The schema category has the containertruesegmentFieldslugpath/automobiles
The schema vehicle has the containerfalsesegmentFieldslugpath/automobiles/ford-gt
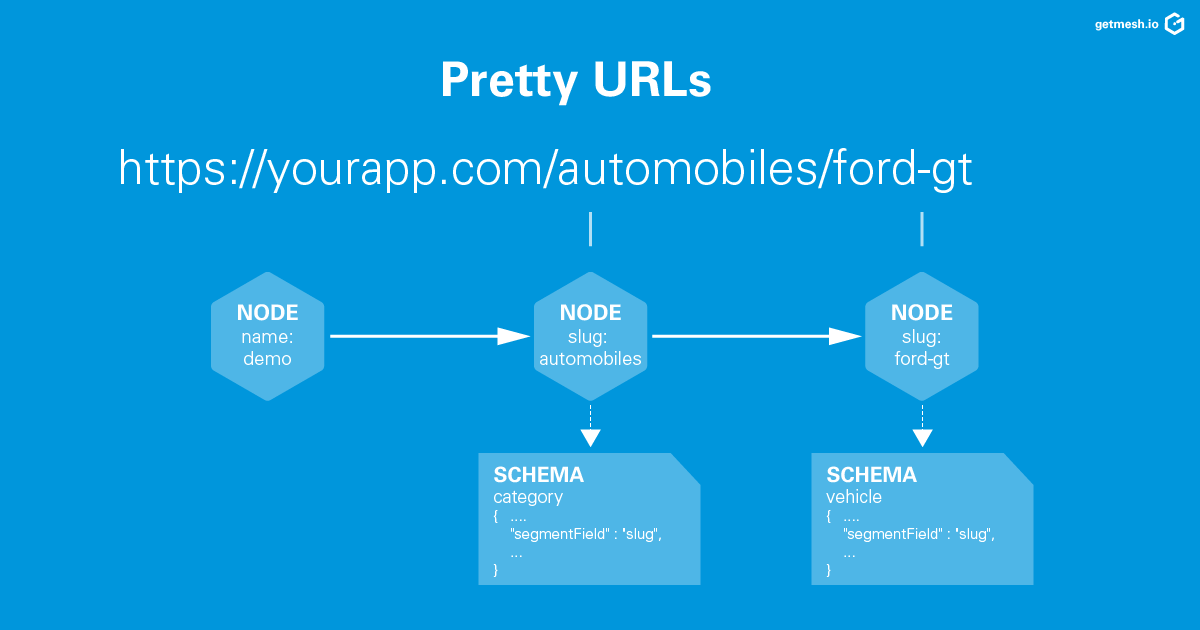
Pretty URLs
Instead of relying on UUIDs to link your content, you can use pretty URLs like https://yourapp.com/automobiles/ford-gt. For each node, Gentics Mesh will provide you with a human readable path. Likewise, you can query your content using WebRoot paths instead of using UUIDs (see WebRoot API).
The segmentField/automobiles/ford-gt
The pathlanguagesPath/api/v2/projectName/nodes/:nodeUuidresolveLinks/api/v2/:projectName/webroot/:path
You can also specify dedicated paths for nodes using the urlFieldsurlFields
API endpoints
| Description | API endpoint |
|---|---|
Get the node with the given UUID. |
|
Response Sample
[source,json]
----
{
  "uuid" : "fc3c85be82584ae2bc85be82588ae2b0",
  "creator" : {
    "uuid" : "e5861ba26b914b21861ba26b91ab211a"
  },
  "created" : "2018-02-23T16:30:44Z",
  "editor" : {
    "uuid" : "e5861ba26b914b21861ba26b91ab211a"
  },
  "edited" : "2018-03-16T15:28:04Z",
  "language" : "en",
  "availableLanguages" : {
    "en" : {
      "published" : true,
      "version" : "3.0",
      "publisher" : {
        "uuid" : "e5861ba26b914b21861ba26b91ab211a"
      },
      "publishDate" : "2018-03-16T15:28:04Z"
    }
  },
  "languagePaths" : {
    "en" : "/automobiles/ford-gt"
  },
  "parentNode" : {
    "projectName" : "demo",
    "uuid" : "ca6c7df3f45b48d4ac7df3f45ba8d42f",
    "displayName" : "Automobiles",
    "path" : "/automobiles",
    "schema" : {
      "name" : "category",
      "uuid" : "2ca2362b041247c4a2362b041227c4da"
    }
  },
  "tags" : [ {
    "name" : "Gasoline",
    "uuid" : "1c51487f8e8043c291487f8e8053c2c1",
    "tagFamily" : "Fuels"
  }, {
    "name" : "Blue",
    "uuid" : "6e6f1d9f055447d2af1d9f055417d289",
    "tagFamily" : "Colors"
  }, {
    "name" : "White",
    "uuid" : "94fec98d6f114e81bec98d6f118e81cc",
    "tagFamily" : "Colors"
  } ],
  "project" : {
    "name" : "demo",
    "uuid" : "217f8c981ada4642bf8c981adaa642c3"
  },
  "childrenInfo" : { },
  "schema" : {
    "name" : "vehicle",
    "uuid" : "2aa83a2b3cba40a1a83a2b3cba90a1de",
    "version" : "3.0"
  },
  "container" : false,
  "displayField" : "name",
  "displayName" : "Ford GT",
  "fields" : {
    "slug" : "ford-gt",
    "name" : "Ford GT",
    "weight" : 1520,
    "SKU" : 1,
    "price" : 4.1E49,
    "stocklevel" : 20,
    "description" : "The Ford GT is an American mid-engine two-seater sports car that was produced by Ford for the 2005 through 2006 model years.",
    "vehicleImage" : {
      "uuid" : "df8beb3922c94ea28beb3922c94ea2f6",
      "path" : "/images/ford-gt.jpg",
      "languagePaths" : {
        "en" : "/images/ford-gt.jpg"
      }
    },
    "somedate" : "2018-03-16T11:05:00Z"
  },
  "path" : "/automobiles/ford-gt",
  "breadcrumb" : [ {
    "projectName" : "demo",
    "uuid" : "688f7beae8d240bf8f7beae8d2a0bf2e",
    "path" : "/",
    "schema" : {
      "name" : "folder",
      "uuid" : "3021de5632e94fe8a1de5632e95fe87c"
    }
  }, {
    "projectName" : "demo",
    "uuid" : "ca6c7df3f45b48d4ac7df3f45ba8d42f",
    "displayName" : "Automobiles",
    "path" : "/automobiles",
    "schema" : {
      "name" : "category",
      "uuid" : "2ca2362b041247c4a2362b041227c4da"
    }
  }, {
    "projectName" : "demo",
    "uuid" : "fc3c85be82584ae2bc85be82588ae2b0",
    "displayName" : "Ford GT",
    "path" : "/automobiles/ford-gt",
    "schema" : {
      "name" : "vehicle",
      "uuid" : "2aa83a2b3cba40a1a83a2b3cba90a1de"
    }
  } ],
  "version" : "3.1",
  "permissions" : {
    "create" : false,
    "read" : true,
    "update" : false,
    "delete" : false,
    "publish" : false,
    "readPublished" : true
  }
}
----

[[navigation]]
== Navigation Menus
When organizing your content in terms of a node tree, Gentics Mesh offers two ways of generating a nested navigation response.

The API endpoint ```{apiLatest}/:projectName/nodes/:nodeUuid/navigation``` returns a navigation object for the provided node, while the ```{apiLatest}/:projectName/navroot/:path``` API endpoint returns a navigation object for a node which is located using a given path.
Each endpoint will return a navigation response which contains the nested navigation tree structure.

By default, only container nodes are included in a navigation response. The `includeAll` query parameter will include all nodes, if set to `true`.
The `maxDepth` parameter may be used to limit the navigation depth. In order to include the `path` property in the navigation response, the `resolveLinks` query parameter can be used.

image::../images/GenticsMesh-Navigation-Example.png[Gentics Mesh Example for Building Navigation Menus,role="img-responsive"]

The demo app includes a navigation object showing just the top-level elements _Automobiles_, _Aircraft_, and _Yachts_ as well as the _Home_ link. All the elements can be easily queried using the available navigation endpoints. In particular, the example uses the ```{apiLatest}/:projectName/navroot/:path``` API endpoint, with the URL parameter ```:path``` querying the project root node, i.e., ```/``` together with query parameter ```?maxDepth``` limiting the resulting nested JSON object to the top-level nodes.


=== API endpoints

[options="header",cols="2*"]
|======

| Description
| API endpoint

| Returns a navigation object for the provided node.
| ```GET {apiLatest}/:projectName/nodes/:nodeUuid/navigation```

| Return a navigation for the node which is located using the given path.
| ```GET {apiLatest}/:projectName/navroot/:path```

|======

=== Response Sample

Retrieving a navigation object using the projects root node ```/``` including the top level navigation menu items.

```GET {apiLatest}/demo/navroot/?resolveLinks=short&maxDepth=1```

The same can be achieved using the node specific navigation endpoint. In this case you can specify the root node of your navigation by providing the node uuid.

```GET {apiLatest}/demo/nodes/688f7beae8d240bf8f7beae8d2a0bf2e/navigation?resolveLinks=short&maxDepth=1```

[source,json]
----
{
  "uuid" : "688f7beae8d240bf8f7beae8d2a0bf2e",
  "node" : {
    "uuid" : "688f7beae8d240bf8f7beae8d2a0bf2e",
    "creator" : {
      "uuid" : "e5861ba26b914b21861ba26b91ab211a"
    },
    "created" : "2018-07-02T10:48:53Z",
    "editor" : {
      "uuid" : "e5861ba26b914b21861ba26b91ab211a"
    },
    "edited" : "2018-07-02T10:49:13Z",
    "language" : "en",
    "availableLanguages" : {
      "en" : {
        "published" : true,
        "version" : "1.0",
        "publisher" : {
          "uuid" : "e5861ba26b914b21861ba26b91ab211a"
        },
        "publishDate" : "2018-07-02T10:49:13Z"
      }
    },
    "languagePaths" : {
      "en" : "/"
    },
    "tags" : [ ],
    "project" : {
      "name" : "demo",
      "uuid" : "217f8c981ada4642bf8c981adaa642c3"
    },
    "childrenInfo" : {
      "folder" : {
        "schemaUuid" : "839ef8b50bf9493e9ef8b50bf9e93e24",
        "count" : 1
      },
      "category" : {
        "schemaUuid" : "2ca2362b041247c4a2362b041227c4da",
        "count" : 3
      }
    },
    "schema" : {
      "name" : "folder",
      "uuid" : "839ef8b50bf9493e9ef8b50bf9e93e24",
      "version" : "1.0"
    },
    "container" : true,
    "displayField" : "name",
    "fields" : { },
    "path" : "/",
    "breadcrumb" : [ {
      "projectName" : "demo",
      "uuid" : "688f7beae8d240bf8f7beae8d2a0bf2e",
      "path" : "/",
      "schema" : {
        "name" : "folder",
        "uuid" : "839ef8b50bf9493e9ef8b50bf9e93e24"
      }
    } ],
    "version" : "1.0",
    "permissions" : {
      "create" : false,
      "read" : true,
      "update" : false,
      "delete" : false,
      "publish" : false,
      "readPublished" : true
    }
  },
  "children" : [ {
    "uuid" : "15d5ef7a9abf416d95ef7a9abf316d68",
    "node" : {
      "uuid" : "15d5ef7a9abf416d95ef7a9abf316d68",
      "creator" : {
        "uuid" : "e5861ba26b914b21861ba26b91ab211a"
      },
      "created" : "2018-07-02T10:49:04Z",
      "editor" : {
        "uuid" : "e5861ba26b914b21861ba26b91ab211a"
      },
      "edited" : "2018-07-02T10:49:13Z",
      "language" : "en",
      "availableLanguages" : {
        "en" : {
          "published" : true,
          "version" : "1.0",
          "publisher" : {
            "uuid" : "e5861ba26b914b21861ba26b91ab211a"
          },
          "publishDate" : "2018-07-02T10:49:13Z"
        }
      },
      "languagePaths" : {
        "en" : "/images"
      },
      "parentNode" : {
        "projectName" : "demo",
        "uuid" : "688f7beae8d240bf8f7beae8d2a0bf2e",
        "path" : "/",
        "schema" : {
          "name" : "folder",
          "uuid" : "839ef8b50bf9493e9ef8b50bf9e93e24"
        }
      },
      "tags" : [ ],
      "project" : {
        "name" : "demo",
        "uuid" : "217f8c981ada4642bf8c981adaa642c3"
      },
      "childrenInfo" : {
        "vehicleImage" : {
          "schemaUuid" : "b12272150db4490ea272150db4190e72",
          "count" : 11
        }
      },
      "schema" : {
        "name" : "folder",
        "uuid" : "839ef8b50bf9493e9ef8b50bf9e93e24",
        "version" : "1.0"
      },
      "container" : true,
      "displayField" : "name",
      "displayName" : "Vehicle Images",
      "fields" : {
        "slug" : "images",
        "name" : "Vehicle Images"
      },
      "path" : "/images",
      "breadcrumb" : [ {
        "projectName" : "demo",
        "uuid" : "688f7beae8d240bf8f7beae8d2a0bf2e",
        "path" : "/",
        "schema" : {
          "name" : "folder",
          "uuid" : "839ef8b50bf9493e9ef8b50bf9e93e24"
        }
      }, {
        "projectName" : "demo",
        "uuid" : "15d5ef7a9abf416d95ef7a9abf316d68",
        "displayName" : "Vehicle Images",
        "path" : "/images",
        "schema" : {
          "name" : "folder",
          "uuid" : "839ef8b50bf9493e9ef8b50bf9e93e24"
        }
      } ],
      "version" : "1.0",
      "permissions" : {
        "create" : false,
        "read" : true,
        "update" : false,
        "delete" : false,
        "publish" : false,
        "readPublished" : true
      }
    }
  }, {
    "uuid" : "ca6c7df3f45b48d4ac7df3f45ba8d42f",
    "node" : {
      "uuid" : "ca6c7df3f45b48d4ac7df3f45ba8d42f",
      "creator" : {
        "uuid" : "e5861ba26b914b21861ba26b91ab211a"
      },
      "created" : "2018-07-02T10:49:08Z",
      "editor" : {
        "uuid" : "e5861ba26b914b21861ba26b91ab211a"
      },
      "edited" : "2018-07-02T10:49:13Z",
      "language" : "en",
      "availableLanguages" : {
        "en" : {
          "published" : true,
          "version" : "1.0",
          "publisher" : {
            "uuid" : "e5861ba26b914b21861ba26b91ab211a"
          },
          "publishDate" : "2018-07-02T10:49:13Z"
        }
      },
      "languagePaths" : {
        "en" : "/automobiles"
      },
      "parentNode" : {
        "projectName" : "demo",
        "uuid" : "688f7beae8d240bf8f7beae8d2a0bf2e",
        "path" : "/",
        "schema" : {
          "name" : "folder",
          "uuid" : "839ef8b50bf9493e9ef8b50bf9e93e24"
        }
      },
      "tags" : [ ],
      "project" : {
        "name" : "demo",
        "uuid" : "217f8c981ada4642bf8c981adaa642c3"
      },
      "childrenInfo" : {
        "vehicle" : {
          "schemaUuid" : "2aa83a2b3cba40a1a83a2b3cba90a1de",
          "count" : 6
        }
      },
      "schema" : {
        "name" : "category",
        "uuid" : "2ca2362b041247c4a2362b041227c4da",
        "version" : "1.0"
      },
      "container" : true,
      "displayField" : "name",
      "displayName" : "Automobiles",
      "fields" : {
        "name" : "Automobiles",
        "slug" : "automobiles"
      },
      "path" : "/automobiles",
      "breadcrumb" : [ {
        "projectName" : "demo",
        "uuid" : "688f7beae8d240bf8f7beae8d2a0bf2e",
        "path" : "/",
        "schema" : {
          "name" : "folder",
          "uuid" : "839ef8b50bf9493e9ef8b50bf9e93e24"
        }
      }, {
        "projectName" : "demo",
        "uuid" : "ca6c7df3f45b48d4ac7df3f45ba8d42f",
        "displayName" : "Automobiles",
        "path" : "/automobiles",
        "schema" : {
          "name" : "category",
          "uuid" : "2ca2362b041247c4a2362b041227c4da"
        }
      } ],
      "version" : "1.0",
      "permissions" : {
        "create" : false,
        "read" : true,
        "update" : false,
        "delete" : false,
        "publish" : false,
        "readPublished" : true
      }
    }
  }, {
    "uuid" : "21203632520b4d19a03632520b2d19c1",
    "node" : {
      "uuid" : "21203632520b4d19a03632520b2d19c1",
      "creator" : {
        "uuid" : "e5861ba26b914b21861ba26b91ab211a"
      },
      "created" : "2018-07-02T10:49:12Z",
      "editor" : {
        "uuid" : "e5861ba26b914b21861ba26b91ab211a"
      },
      "edited" : "2018-07-02T10:49:13Z",
      "language" : "en",
      "availableLanguages" : {
        "en" : {
          "published" : true,
          "version" : "1.0",
          "publisher" : {
            "uuid" : "e5861ba26b914b21861ba26b91ab211a"
          },
          "publishDate" : "2018-07-02T10:49:13Z"
        }
      },
      "languagePaths" : {
        "en" : "/aircrafts"
      },
      "parentNode" : {
        "projectName" : "demo",
        "uuid" : "688f7beae8d240bf8f7beae8d2a0bf2e",
        "path" : "/",
        "schema" : {
          "name" : "folder",
          "uuid" : "839ef8b50bf9493e9ef8b50bf9e93e24"
        }
      },
      "tags" : [ ],
      "project" : {
        "name" : "demo",
        "uuid" : "217f8c981ada4642bf8c981adaa642c3"
      },
      "childrenInfo" : {
        "vehicle" : {
          "schemaUuid" : "2aa83a2b3cba40a1a83a2b3cba90a1de",
          "count" : 3
        }
      },
      "schema" : {
        "name" : "category",
        "uuid" : "2ca2362b041247c4a2362b041227c4da",
        "version" : "1.0"
      },
      "container" : true,
      "displayField" : "name",
      "displayName" : "Aircraft",
      "fields" : {
        "name" : "Aircraft",
        "slug" : "aircrafts"
      },
      "path" : "/aircrafts",
      "breadcrumb" : [ {
        "projectName" : "demo",
        "uuid" : "688f7beae8d240bf8f7beae8d2a0bf2e",
        "path" : "/",
        "schema" : {
          "name" : "folder",
          "uuid" : "839ef8b50bf9493e9ef8b50bf9e93e24"
        }
      }, {
        "projectName" : "demo",
        "uuid" : "21203632520b4d19a03632520b2d19c1",
        "displayName" : "Aircraft",
        "path" : "/aircrafts",
        "schema" : {
          "name" : "category",
          "uuid" : "2ca2362b041247c4a2362b041227c4da"
        }
      } ],
      "version" : "1.0",
      "permissions" : {
        "create" : false,
        "read" : true,
        "update" : false,
        "delete" : false,
        "publish" : false,
        "readPublished" : true
      }
    }
  }, {
    "uuid" : "eb2ebdcc0e894a9eaebdcc0e896a9e1d",
    "node" : {
      "uuid" : "eb2ebdcc0e894a9eaebdcc0e896a9e1d",
      "creator" : {
        "uuid" : "e5861ba26b914b21861ba26b91ab211a"
      },
      "created" : "2018-07-02T10:49:13Z",
      "editor" : {
        "uuid" : "e5861ba26b914b21861ba26b91ab211a"
      },
      "edited" : "2018-07-02T10:49:13Z",
      "language" : "en",
      "availableLanguages" : {
        "en" : {
          "published" : true,
          "version" : "1.0",
          "publisher" : {
            "uuid" : "e5861ba26b914b21861ba26b91ab211a"
          },
          "publishDate" : "2018-07-02T10:49:13Z"
        }
      },
      "languagePaths" : {
        "en" : "/yachts"
      },
      "parentNode" : {
        "projectName" : "demo",
        "uuid" : "688f7beae8d240bf8f7beae8d2a0bf2e",
        "path" : "/",
        "schema" : {
          "name" : "folder",
          "uuid" : "839ef8b50bf9493e9ef8b50bf9e93e24"
        }
      },
      "tags" : [ ],
      "project" : {
        "name" : "demo",
        "uuid" : "217f8c981ada4642bf8c981adaa642c3"
      },
      "childrenInfo" : {
        "vehicle" : {
          "schemaUuid" : "2aa83a2b3cba40a1a83a2b3cba90a1de",
          "count" : 2
        }
      },
      "schema" : {
        "name" : "category",
        "uuid" : "2ca2362b041247c4a2362b041227c4da",
        "version" : "1.0"
      },
      "container" : true,
      "displayField" : "name",
      "displayName" : "Yachts",
      "fields" : {
        "name" : "Yachts",
        "slug" : "yachts"
      },
      "path" : "/yachts",
      "breadcrumb" : [ {
        "projectName" : "demo",
        "uuid" : "688f7beae8d240bf8f7beae8d2a0bf2e",
        "path" : "/",
        "schema" : {
          "name" : "folder",
          "uuid" : "839ef8b50bf9493e9ef8b50bf9e93e24"
        }
      }, {
        "projectName" : "demo",
        "uuid" : "eb2ebdcc0e894a9eaebdcc0e896a9e1d",
        "displayName" : "Yachts",
        "path" : "/yachts",
        "schema" : {
          "name" : "category",
          "uuid" : "2ca2362b041247c4a2362b041227c4da"
        }
      } ],
      "version" : "1.0",
      "permissions" : {
        "create" : false,
        "read" : true,
        "update" : false,
        "delete" : false,
        "publish" : false,
        "readPublished" : true
      }
    }
  } ]
}
----

== Breadcrumbs

Each node in Gentics Mesh provides information on where it is located within the node tree in terms of its ```breadcrumb``` property.
The property provides an array of node references representing the path from the project root down to the current node. For more details see the documentation on link:/docs/building-blocks/#_node[node].

In our demo app example, the ```breadcrumb``` property for node _Ford GT_ will therefore include the node _Automobiles_.

image::../images/GenticsMesh-Breadcrumb-Example.png[Gentics Mesh Example for Building Breadcumbs,role="img-responsive"]

The ```breadcrumb``` property will be returned in all API responses containing nodes. Using the ```resolveLink``` query parameter will also the paths of the nodes listed in the array.

=== API endpoints

[options="header",cols="2*"]
|======

| Description
| API endpoint

| Get all nodes of a project and return a paged list response.
| ```GET {apiLatest}/projectName/nodes```

| Get the node with the given UUID.
| ```GET {apiLatest}/:projectName/nodes/:nodeUuid```

| Load the node or the node's binary data, which is located using the provided path.
| ```GET {apiLatest}/:projectName/webroot/:path```

|======

=== Response Sample

```GET {apiLatest}/demo/nodes/fc3c85be82584ae2bc85be82588ae2b0?resolveLinks=short```

[source,json]
----
{
  "uuid" : "fc3c85be82584ae2bc85be82588ae2b0",
  "creator" : {
    "uuid" : "e5861ba26b914b21861ba26b91ab211a"
  },
  "created" : "2018-07-02T10:49:09Z",
  "editor" : {
    "uuid" : "e5861ba26b914b21861ba26b91ab211a"
  },
  "edited" : "2018-07-02T10:49:13Z",
  "language" : "en",
  "availableLanguages" : {
    "en" : {
      "published" : true,
      "version" : "1.0",
      "publisher" : {
        "uuid" : "e5861ba26b914b21861ba26b91ab211a"
      },
      "publishDate" : "2018-07-02T10:49:13Z"
    }
  },
  "languagePaths" : {
    "en" : "/automobiles/ford-gt"
  },
  "parentNode" : {
    "projectName" : "demo",
    "uuid" : "ca6c7df3f45b48d4ac7df3f45ba8d42f",
    "displayName" : "Automobiles",
    "path" : "/automobiles",
    "schema" : {
      "name" : "category",
      "uuid" : "2ca2362b041247c4a2362b041227c4da"
    }
  },
  "tags" : [ {
    "name" : "Gasoline",
    "uuid" : "1c51487f8e8043c291487f8e8053c2c1",
    "tagFamily" : "Fuels"
  }, {
    "name" : "Blue",
    "uuid" : "6e6f1d9f055447d2af1d9f055417d289",
    "tagFamily" : "Colors"
  }, {
    "name" : "White",
    "uuid" : "94fec98d6f114e81bec98d6f118e81cc",
    "tagFamily" : "Colors"
  } ],
  "project" : {
    "name" : "demo",
    "uuid" : "217f8c981ada4642bf8c981adaa642c3"
  },
  "childrenInfo" : { },
  "schema" : {
    "name" : "vehicle",
    "uuid" : "2aa83a2b3cba40a1a83a2b3cba90a1de",
    "version" : "1.0"
  },
  "container" : false,
  "displayField" : "name",
  "displayName" : "Ford GT",
  "fields" : {
    "slug" : "ford-gt",
    "name" : "Ford GT",
    "weight" : 1520,
    "SKU" : 1,
    "price" : 139995,
    "stocklevel" : 20,
    "description" : "The Ford GT is an American mid-engine two-seater sports car that was produced by Ford for the 2005 through 2006 model years.",
    "vehicleImage" : {
      "uuid" : "df8beb3922c94ea28beb3922c94ea2f6",
      "path" : "/images/ford-gt.jpg",
      "languagePaths" : {
        "en" : "/images/ford-gt.jpg"
      }
    }
  },
  "path" : "/automobiles/ford-gt",
  "breadcrumb" : [ {
    "projectName" : "demo",
    "uuid" : "688f7beae8d240bf8f7beae8d2a0bf2e",
    "path" : "/",
    "schema" : {
      "name" : "folder",
      "uuid" : "839ef8b50bf9493e9ef8b50bf9e93e24"
    }
  }, {
    "projectName" : "demo",
    "uuid" : "ca6c7df3f45b48d4ac7df3f45ba8d42f",
    "displayName" : "Automobiles",
    "path" : "/automobiles",
    "schema" : {
      "name" : "category",
      "uuid" : "2ca2362b041247c4a2362b041227c4da"
    }
  }, {
    "projectName" : "demo",
    "uuid" : "fc3c85be82584ae2bc85be82588ae2b0",
    "displayName" : "Ford GT",
    "path" : "/automobiles/ford-gt",
    "schema" : {
      "name" : "vehicle",
      "uuid" : "2aa83a2b3cba40a1a83a2b3cba90a1de"
    }
  } ],
  "version" : "1.0",
  "permissions" : {
    "create" : false,
    "read" : true,
    "update" : false,
    "delete" : false,
    "publish" : false,
    "readPublished" : true
  }
}
----

[[webroot]]
== Fetch Content with WebRoot Paths

The WebRoot API is an alternative way for fetching content from Gentics Mesh. Other than accessing nodes with their UUID, one can use the way more intuitive WebRoot paths.

image::../images/GenticsMesh-WebRootAPI-Example.png[Gentics Mesh Example for Fetching Content by Path using the WebRoot API,role="img-responsive"]

This functionality builds on top of the schema ```segmentField``` and ```urlFields``` property to define the path of a specific node.

WebRoot paths of arbitrary depth can be created, in combination with organizing content hierarchically in terms of a <<contenttree,content tree>> by specifying nodes to be ```containers``` for their child nodes.
The WebRoot API endpoint uses this information to resolve a given path to a node UUID. Each node in turn will provide a single `segment` to the full path via the referenced `segmentField`.

=== Url Fields
In addition to ```segmentField``` it is also possible to create completely custom URLs to your content using the ```urlFields``` schema property. You can reference `string` and `string list` fields within your schema using the property.
Gentics Mesh will only make sure that there are no collisions between custom paths of other nodes. Saving a node which uses the same urlField value would cause a conflict error.
Those fields can in turn contain a custom path to your node. It is important to note that conflicts between custom url field values and existing paths which are build using the `segmentPath` property will not cause a conflict. You can use this in order to override an existing path to a node using a custom path.
Custom paths via the `urlFields` property will always be resolved first and thus overrule the `segmentField` paths.
Note that the custom path must start with a forward slash, otherwise it will be ignored.
For example, the following will not work:

[source,json]
{
  "fields": {
    "myUrlField": "hello-world/example-page.html"
  }
}

[options="header",cols="3*"]
|======

| Request
| API endpoint
| Response code
| GET
| /api/v2/docs/hello-world/example-page.html
| 404
|======


By prepending the path with a forward slash, the same request will resolve the node correctly:
[source,json]
{
  "fields": {
    "myUrlField": "/hello-world/example-page.html"
  }
}

[options="header",cols="3*"]
|======

| Request
| API endpoint
| Response code
| GET
| /api/v2/docs/hello-world/example-page.html
| 200
|======

Possible applications for the `urlFields` property are:

* Short URL support
* Nice URL handling
* Redirection handling

Using the WebRoot API it is possible to easily integrate Gentics Mesh with many known routing frameworks.

[options="header"]
|======
| Framework                           | Language       | Example
| http://silex.sensiolabs.org/[Silex] | PHP            | https://getmesh.io/Blog/Building+an+API-first+Web+App+with+Gentics+Mesh+and+the+PHP+Microframework+Silex[blog post]
| http://expressjs.com/[ExpressJS]    | JS             | https://getmesh.io/Blog/Getting+started+with+Express+and+the+API-first+CMS+Gentics+Mesh[blog post]
| http://vertx.io/[Vert.x]            | Java,JS,Ceylon | http://vertx.io/blog/data-driven-apps-made-easy-with-vert-x-3-4-0-and-headless-cms-gentics-mesh/[blog post]
| http://lotusrb.org/[Lotus]          | Ruby           | -
|======

//TODO blog post on WebRoot API

=== API endpoints

[options="header",cols="2*"]
|======

| Description
| API endpoint

| Load the node or the node's binary data, which is located using the provided path.
| link:++/docs/api#project__webroot__path__get[```GET {apiLatest}/:projectName/webroot/:path```]


|======

=== Query content by path

A WebRoot path may consist of multiple path segments, each corresponding to a node within the content tree. The ```segmentField``` property from the schema is used to determine the node's relevant field value.

NOTE: Each segment of the URL must be URL-encoded. A node's contents must provide different path segment in order to guarantee unique paths.

==== Fetch node with UUID

Loading the node with the given UUID using API endpoint ```GET {apiLatest}/:projectName/nodes/:nodeUuid```.

==== Fetch node with WebRoot path

```GET {apiLatest}/demo/webroot/automobiles/ford-gt?resolveLinks=short```

=== Query binary content by path
The WebRoot API, furthermore, directly supports delivering binary content (e.g., images, documents, etc.) using the ```fileName``` meta-data field of the ```binary``` field.

TIP: The ```Webroot-Response-Type``` header can be used to differentiate between binary and node responses. The values of this header can  be either ```binary``` or ```node```. This allows to differentiate between binary content with ```Content-Type: application/json``` and typical node responses also delivered with ```Content-Type: application/json```.

NOTE: Downloads of resized images currently do not support byte range requests.

==== Fetch an image with UUID

```GET {apiLatest}/demo/nodes/df8beb3922c94ea28beb3922c94ea2f6/binary/image```

Downloading a node's binary field with the given name using API endpoint ```GET {apiLatest}/:projectName/nodes/:nodeUuid/binary/:fieldName```.

==== Fetch an image with WebRoot path

```GET {apiLatest}/demo/webroot/images/ford-gt.jpg```

TIP: When using a routing framework, in order to find out if a requested resource is binary data or JSON data you need to check the HTTP Content-Disposition response header. If it is set, it’s binary data.

=== Image manipulation by path

In case, the binary data is an image, the WebRoot API allows to directly perform
link:/docs/image-manipulation/[Image Manipulation] such as cropping and resizing.

==== Crop and resize an image with UUID

```GET {apiLatest}/demo/nodes/df8beb3922c94ea28beb3922c94ea2f6/binary/image?rect=10,100,800,400&w=300&crop=rect```

==== Crop and resize an image with WebRoot path

```GET {apiLatest}/demo/webroot/images/ford-gt.jpg?rect=10,100,800,400&w=300&crop=rect```

== Link Resolving

Link resolving represents the counterpart of the <<webroot, WebRoot API>> - a node UUID can be resolved into a WebRoot path.

image::../images/GenticsMesh-LinkResolver-Utility-Example.png[Gentics Mesh Example for automatically Resolving Links,role="img-responsive"]

Typically, editors create content including internal links to other nodes. When fetching content for your apps, however, Gentics Mesh will resolve these internal links for you and return a WebRoot path.

For example, ```{{mesh.link("2f2de9297c8143e8ade9297c8193e8fc", "en")}}``` will be transformed into ```{apiLatest}/demo/webroot/images/ford-gt.jpg``` when using the ```?resolveLinks=full``` query parameter.

The ```?resolveLinks``` query parameter defines if and how links are resolved:

* `off` -  links will not be resolved. This is the default.
* `full` - the resolved links will contain the WebRoot prefix and project name (```{apiLatest}/:projectName/webRoot/:path```).
* `medium` - the resolved links will contain the project name (```/:projectName/:path```).
* `short` - will contain neither WebRoot prefix nor project name, just the path (```:path```).

The ```?resolveLinks``` query parameter can be applied to all API endpoints returning nodes.

[[crossdomainlinks]]
=== Cross Domain/Project Links

In some cases it may be desirable to be able to create links which point to nodes within different projects.
In these situations the link should no longer be relative but instead contain the domain and protocol which is used by the project of the referenced node.

You can specify the `hostname` and `ssl` flag when creating a project. This will in turn store this information within the created branch of the project. Gentics Mesh will make use of this information once you render a foreign node's link using the *short* type.
The links will automatically start with `https://` if the ssl flag of the branch has been set to true. You can update the hostname/ssl flag at any time by updating the branch of the project.

NOTE: Foreign links can only be rendered using the *?resolveLinks=short* type. Other resolver types do not support this mechanism.

[[linkresolvingbranches]]
=== Specifying Branches

It is also possible to specify a branch as a third parameter of the mesh link.
Both the UUID and branch name can be used to resolve the branch.
If the uuid or branch name cannot be found for the linked node, the latest branch will be used instead.

Examples:

* `{{mesh.link("2f2de9297c8143e8ade9297c8193e8fc", "en", "winter")}}`

* `{{mesh.link("2f2de9297c8143e8ade9297c8193e8fc", "en", "e007a9f6f6c8404fbd81f96489764401")}}`

=== API endpoints

[options="header",cols="2*"]
|======

| Description
| API endpoint

| Get all nodes of a project and return a paged list response.
| ```GET {apiLatest}/projectName/nodes```

| Get the node with the given UUID.
| ```GET {apiLatest}/:projectName/nodes/:nodeUuid```

| Load the node or the node's binary data, which is located using the provided path.
| ```GET {apiLatest}/:projectName/webroot/:path```

| Get a navigation object for the provided node.
| ```GET {apiLatest}/:projectName/nodes/:nodeUuid/navigation```

| Return a navigation for the node which is located using the given path.
| ```GET {apiLatest}/:projectName/navroot/:path```

|======

=== Link Resolver Utility

In addition to the above, Gentics Mesh offers the ```{apiLatest}/utilities/linkResolver``` endpoint that can be used to resolve Gentics Mesh links within the posted text data. This is useful when resolving links for a preview page.

It’s necessary to send the content in which links should get resolved to the API endpoint in plain text or JSON. The query parameter ```?resolveLinks``` is used to specify how links shall be resolved.

Valid links:

 * {{mesh.link("2f2de9297c8143e8ade9297c8193e8fc", "en")}}

* {{mesh.link('2f2de9297c8143e8ade9297c8193e8fc', 'en')}}

* {{mesh.link(\"2f2de9297c8143e8ade9297c8193e8fc\", \"en\")}}

* {{mesh.link(2f2de9297c8143e8ade9297c8193e8fc, en)}}

* {{mesh.link("2f2de9297c8143e8ade9297c8193e8fc")}} (link to default language)

* {{mesh.link(2f2de9297c8143e8ade9297c8193e8fc)}} (link to default language)


[[imagemanipulation]]
== link:/docs/image-manipulation/[Image Manipulation]

== File Upload

Binary data can be attached to node binary fields. The ```{apiLatest}/nodes/:uuid/binary/:fieldName``` endpoint can be used to POST binary data and thus update the stored binary field.

NOTE: This endpoint is accepting ```multipart/form-data```, only.

It is required to specify the `version` and `language` within the update request. This is similar to regular node update requests in which these information must be added to the JSON object.
----------Geg2Oob Content-Disposition: form-data; name="version"
1.0
----------Geg2Oob Content-Disposition: form-data; name="language"
en
----------Geg2Oob Content-Disposition: form-data; name="shohY6d"; filename="somefile.bin" Content-Type: application/octet-stream Content-Transfer-Encoding: binary
fileData
----------Geg2Oob--
The mimeType of binaries which don't have a `mimeType` property will be automatically be determined via the file extension as a fallback mechanism.

=== Configuration

Gentics Mesh stores all binary files on the filesystem. The default directory ```data/binaryfiles``` can be changed in the upload section of the main configuration file ```mesh.yml```.

The upload limit can be configured in bytes using the ```uploadOptions.byteLimit``` setting.

For more information on available settings have a look at the link:/docs/administration-guide/#_settings[administration guide].

=== Metadata handling

Metadata information of uploads will automatically be extracted and added the `metadata` object of the binary field.

You can disable this feature in the global options by setting link:/docs/administration-guide/#_upload_options[`upload.parser`] to false.

You can also disable this feature per field. See link:/docs/building-blocks/#_binary[binary schema field documentation] for more information.

You can set a whitelist of allowed metadata (link:/docs/administration-guide/#_upload_options[```upload.metadataWhitelist```]). Setting that list will only save metadata with keys specified in that list.

Currently the following __mime-types__ are supported:

Doc:

* `application/pdf`
*	`application/msword`
* `application/vnd.openxmlformats-officedocument.wordprocessingml.document`

Image:

* `image/jpeg`
* `image/jpg`
* `image/png`

Audio:

* `audio/flac`
* `audio/mp3`
* `audio/ogg`
* `audio/x-matroska`

Video:

* `video/ogg`
* `video/mp4`
* `video/x-matroska`


The GPS information of images will be processed and provided in a `location` object. A geopoint will automatically be stored for the document in the search index. This way it is possible to run link:/docs/elasticsearch/#_search_nodes_by_geolocation_of_images[geo search queries] to locate images within a specific area.

Example response:
[source,json]
----
{
…
  "fields" : {
    "binary" : {
      "binaryUuid" : "304a132ca8e740f68a132ca8e710f60d",
      "fileName" : "android-africa-gps.jpg",
      "width" : 200,
      "height" : 150,
      "sha512sum" : "0dbd4fcfc27be88aae7f78848b75e55f30983b0bccdf187f483e3c1e28d11b697e765254c1b52ea79a2c1cfa6fb6b749c4500baceb5ed70ee22646515fff94e7",
      "fileSize" : 29354,
      "mimeType" : "image/jpeg",
      "dominantColor" : "#a5a4a1",
      "metadata" : {
        "location" : {
          "lon" : 18.408889,
          "lat" : -33.961111
        },
        "date" : "2018-07-17T13:16:37",
        "exif_ExposureTime" : "0.016666666666666666",
        "Compression" : "JPEG (old-style)",
        "Image_Height" : "376 pixels",
        "Resolution_Units" : "inch",
        "Thumbnail_Width_Pixels" : "0",
        "File_Size" : "29354 bytes",
        "White_Balance_Mode" : "Auto white balance",
        "Focal_Length_35" : "26 mm",
        "tiff_YResolution" : "72.0",
        "Exif_Image_Height" : "150 pixels",
        "Max_Aperture_Value" : "f/1.7",
        "Metering_Mode" : "Center weighted average",
        "F-Number" : "f/1.7",
        "tiff_BitsPerSample" : "8",
        "modified" : "2018-07-17T13:16:37",
        "w_comments" : "Komischer Hamser",
        "tiff_Make" : "samsung",
        "Exif_Version" : "2.20",
        "Exif_Image_Width" : "200 pixels",
        "Scene_Capture_Type" : "Standard",
        "YCbCr_Positioning" : "Center of pixel array",
        "Date/Time_Original" : "2018:02:17 18:03:22",
        "Creation-Date" : "2018-02-17T19:03:22",
        "Make" : "samsung",
        "Orientation" : "Top, left side (Horizontal / normal)",
        "Exposure_Program" : "Program normal",
        "ISO_Speed_Ratings" : "64",
        "exif_Flash" : "false",
        "meta_creation-date" : "2018-02-17T19:03:22",
        "Focal_Length" : "4.2 mm",
        "tiff_ResolutionUnit" : "Inch",
        "Number_of_Components" : "3",
        "Resolution_Unit" : "Inch",
        "Exposure_Mode" : "Auto exposure",
        "Number_of_Tables" : "2 Huffman tables",
        "GPS_Latitude_Ref" : "S",
        "dcterms_created" : "2018-02-17T19:03:22",
        "Software" : "GIMP 2.8.18",
        "FlashPix_Version" : "1.00",
        "exif_DateTimeOriginal" : "2018-02-17T19:03:22",
        "Date/Time_Digitized" : "2018:02:17 18:03:22",
        "Data_Precision" : "8 bits",
        "exif_IsoSpeedRatings" : "64",
        "Last-Modified" : "2018-07-17T13:16:37",
        "tiff_ImageWidth" : "200",
        "Last-Save-Date" : "2018-07-17T13:16:37",
        "tiff_Software" : "GIMP 2.8.18",
        "File_Modified_Date" : "Tue Jul 17 14:06:48 +02:00 2018",
        "Image_Width" : "504 pixels",
        "tiff_ImageLength" : "150",
        "tiff_Orientation" : "1",
        "GPS_Latitude" : "-33° 57' 40\"",
        "Compression_Type" : "Progressive, Huffman",
        "GPS_Longitude_Ref" : "E",
        "Thumbnail_Offset" : "886 bytes",
        "Flash" : "Flash did not fire",
        "exif_FocalLength" : "4.2",
        "Exposure_Time" : "1/60 sec",
        "Makernote" : "[98 values]",
        "Comments" : "Animal in africa",
        "tiff_Model" : "SM-G955F",
        "Y_Resolution" : "72 dots per inch",
        "Date/Time" : "2018:07:17 11:16:37",
        "Thumbnail_Height_Pixels" : "0",
        "Component_1" : "Y component: Quantization table 0, Sampling factors 1 horiz/1 vert",
        "Thumbnail_Length" : "4435 bytes",
        "JPEG_Comment" : "Animal in africa",
        "exif_FNumber" : "1.7",
        "X_Resolution" : "72 dots per inch",
        "Component_3" : "Cr component: Quantization table 1, Sampling factors 1 horiz/1 vert",
        "dcterms_modified" : "2018-07-17T13:16:37",
        "Component_2" : "Cb component: Quantization table 1, Sampling factors 1 horiz/1 vert",
        "Color_Space" : "sRGB",
        "Model" : "SM-G955F",
        "GPS_Longitude" : "18° 24' 32\"",
        "comment" : "Animal in africa",
        "Unique_Image_ID" : "F12LLJA00SM F12LLKG01GM",
        "meta_save-date" : "2018-07-17T13:16:37",
        "tiff_XResolution" : "72.0"
      }
    }
  },
…
}
----

The metadata of a binary field can also be updated in order to remove, add new or update existing meta attributes.

NOTE: The metadata within the image data itself will not be updated.

NOTE: Uploading a binary to a field will override any custom metadata with the freshly parsed metadata of the upload.

Example response:
[source,json]
----
{
…
  "fields" : {
    "binary" : {
      "binaryUuid" : "304a132ca8e740f68a132ca8e710f60d",
      "fileName" : "android-africa-gps.jpg",
      "width" : 200,
      "height" : 150,
      "sha512sum" : "0dbd4fcfc27be88aae7f78848b75e55f30983b0bccdf187f483e3c1e28d11b697e765254c1b52ea79a2c1cfa6fb6b749c4500baceb5ed70ee22646515fff94e7",
      "fileSize" : 29354,
      "mimeType" : "image/jpeg",
      "dominantColor" : "#a5a4a1",
      "metadata" : {
        "location" : {
          "lon" : 18.408889,
          "lat" : -33.961111
        },
        "description": "Image of an angry animal in africa",
        "animal_name": "Procavia capensis"
      }
    }
  },
…
}
----

=== Text extraction

Uploaded documents (PDF, Doc, Docx) will automatically be parsed to extract the the plain text content. The `upload.parserLimit` configuration in the `mesh.yml` can be used to limit the parser output. By default a limit of __40.000__ characters has been configured.

The plainText can be accessed via the `plainText` field in GraphQL. The same field is also included in the REST response of a binary field. This field can be modified via REST.

NOTE: The parser limit of documents also affects the metadata extraction. In-line attributes of PDF files will only be added to the list of metadata when the parser limit is set high enough. A `parserLimit` of `-1` can be used to fully parse documents and to ensure that all attributes are identified.

[[binarycheck]]
=== Asynchronous binary check

When the schema for a binary field contains the `checkServiceUrl` property, new binaries are created with a check status of `POSTPONED`. Mesh will regularly send a request for each postponed binary to the respective check service with the following payload:

Example check request payload:
[source, json]
----
{
  "filename" : "test.zip",
  "mimeType" : "application/zip",
  "downloadUrl" : "http://MESH_HOST:MESH_PORT/api/v1/Test/nodes/a881e329c6de4fccb4dce5fa69e32aaa/binary/binaryTest?secret=979be709e3a94467bdeece6fece6d858&lang=en&branch=f339e2a7f4ce4fee86e07a5f981a10a6&version=0.2",
  "callbackUrl" : "http://MESH_HOST:MESH_PORT/api/v1/Test/nodes/a881e329c6de4fccb4dce5fa69e32aaa/binary/binaryTest/checkCallback?secret=979be709e3a94467bdeece6fece6d858&lang=en&branch=f339e2a7f4ce4fee86e07a5f981a10a6&version=0.2"
}
----

The check service can use the given `downloadUrl` to download the binary to perform the actual check. The check service must send the result to the callback URL by posting a JSON with the fields `status` (must be `ACCEPTED` or `DENIED`) and `reason` which contains the reason a file was denied.

Example check result payload:
[source, json]
----
{
    "status": "DENIED",
    "reason": "Maximum filesize exceeded"
}
----

Mesh will set the status of the binary accordingly and if the status is `DENIED` will delete the actual binary data for that file. The file itself is not deleted but truncated to length zero.

A simple example check service is available in the link:/docs/platforms/#_java[Platforms & Clients section].

NOTE: The check result request to Mesh must be authenticated as a user that has permission to actually change the binary.

[[multilanguage]]
== Multi-Language

Gentics Mesh comes with multi-language support out of the box. In particular, a node serves as a container for one or more contents. These contents will store the actual content fields.

You can query individual contents by appending the ```?lang``` query parameter. The ```language``` json property within an update or create request will be used to identify which language variant should be created or updated.

Requests for nodes should contain the requested languages (as comma separated list)as query parameter:

Endpoint: ```{apiLatest}/:projectName/nodes/:uuid?lang=en,de```

If the requested node is available in any of the languages, the response will contain the fields in that language (first language found).

=== Language Fallback

Gentics Mesh allows to configure a ```defaultLanguage``` in the main configuration file ```mesh.yml```. This default language is used as a fallback in case:

. the ```lang``` query parameter has been omitted, or
. the requested content is not available in the specified language.

This fallback mechanism works when fetching nodes but also when requesting navigation objects or breadcrumb information.

NOTE: In order to work properly, the fallback mechanism requires all nodes to have a language variant for the specified ```defaultLanguage```.

== Permissions

=== Overview

Permissions allow to equip different groups of users with access to the content of your project.

In Gentics Mesh, we distinguish the concepts of
link:/docs/building-blocks/#_user[user], link:/docs/building-blocks/#_group[group], and link:/docs/building-blocks/#_role[role] for managing different needs of access.

* A user represents a physical person or a client app that needs to interact with your content.
* Groups are used to gather users of same content needs and access levels, e.g. administrators, editors, and users of your app.
* A role describes a set of permissions on other elements in Gentics Mesh, e.g. nodes, tags, schemas, users.

By assigning a role to a group, the role's permissions are efficiently granted to a set of users.

NOTE: For reasons of readability, we will describe granting permissions to users though technically, permissions are granted to a specific role and applied to users via groups.

// TODO image (anonymous, and other roles having different permissions)
//image::../GenticsMesh-User-Groups-Roles-Demo.png[How User, Groups, Roles & Permissions are organized in Gentics Mesh Demo Example,role="img-responsive"]

[caption=]
.Permissions in Gentics Mesh
[options="header"]
|======
| Permission    | Description
| create        | grants the right to create instances of the element
| read          | grants read access to the element
| update        | grants the right to update the element
| delete        | grants the right to delete the element
| publish       | grants the right to publish/unpublish a node
| readPublished | grants the right to read the published version of the node
|======

NOTE: The ```publish``` and ```readPublish``` permissions are specifically available for node elements.

Most API responses within Gentics Mesh contain a list of permissions. This list indicates which permissions the requesting user has been granted on the returned element(s).

==== Example

The requesting user ```anonymous``` has the ```readPublish``` permission on the requested node only. This means the user is allowed to read the published version of the node but not previous versions or a draft version of the requested element.

Furthermore the user is not allowed to

* ```create``` child nodes
* ```read``` a draft version of the node
* ```update``` the requested node
* ```delete``` the requested node
* ```publish``` a draft version of the requested node, or ```unpublish``` a node.

IMPORTANT: Gentics Mesh by default returns the ```draft``` version of nodes. This means for supporting the ```anonymous``` user and public content, you need to add the ```?version=published``` query parameter on all requests for nodes to avoid _"Missing permissions on object"_ errors. Find out more in the <<versioning,Versioning>> section.


Following, we will discuss how to query, assign and revoke permissions in Gentics Mesh including the available API endpoints:

[caption=]
.API endpoints for querying, assigning, and revoking permissions
[options="header",cols="2*"]
|======

| Description
| API endpoint

| Read the user permissions on element(s) that can be located by the specified path.
| link:/docs/api/#users__userUuid__permissions__path__get[```GET {apiLatest}/users/:userUuid/permissions/:path```]

| Load the permissions between given role and the targeted element(s).
| link:/docs/api/#roles__roleUuid__permissions__pathToElement__get[```GET {apiLatest}/roles/:roleUuid/permissions/:path```]

| Set the permissions between role and the targeted element(s).
| link:/docs/api#roles__roleUuid__permissions__pathToElement__post[```POST {apiLatest}/roles/:roleUuid/permissions/:path```]

|======

The examples provided subsequently, rely on our demo project.

=== Querying Permissions

There are dedicated API endpoints for querying permissions on elements.

NOTE: The following example links, require prior authentication with user ```admin``` (credentials: admin/admin). Please refer to the link:/docs/authentication/[authentication section] to learn about the different authentication mechanisms provided by Gentics Mesh. The https://insomnia.rest/[Insomnia] REST client can be used to build and invoke requests from your browser to Gentics Mesh.

==== Querying Role Permissions
The link:/docs/api/#roles__roleUuid__permissions__pathToElement__get[```GET {apiLatest}/roles/:roleUuid/permissions/:path```] endpoint can be used to query a role's permission on a specific element or set of elements.

For example, the link:/docs/references/#_authentication[authenticated] ```admin``` user is able to find out the configured permissions for role ```Public User``` on node ```fc3c85be82584ae2bc85be82588ae2b0```.

Note that a request with user ```anonymous``` will yield a _Missing object permissions_ error response.

Alternatively, you can use query the element using the respective API endpoint (e.g. link:++/docs/api#project__nodes__get++[```GET {apiLatest}/projectName/nodes```]) and use the ```role``` query parameter to find out another role's (i.e. ```anonymous```) permissions on the element:

==== Querying User Permissions
The endpoint link:/docs/api/#users__userUuid__permissions__path__get[```GET {apiLatest}/users/:userUuid/permissions/:path```] provides a shortcut for querying permissions for specific users directly, e.g., for user ```anonymous```, which is essentially inheriting all permissions from role ```anonymous```.

=== Assigning & Revoking Permissions

The link:/docs/api#roles__roleUuid__permissions__pathToElement__post[```POST {apiLatest}/roles/:roleUuid/permissions/:path```] API endpoint can be used to assign or revoke permissions to/from a role.

* It is important to note that permissions can be granted on individual elements and onto a set of elements, which is identified by the element path name (e.g.: ```/users/:uuid``` and ```/users```).

* Furthermore, the endpoint offers the property ```recursive``` for applying permissions recursively on child elements to which the requesting user has read access..

//COMMENT: This info is interesting for mesh developers, not mesh API users.
//In order to ensure that roles are able to invoke CRUD operations on objects they have created or would have been able to create in the first place, CRUD permissions are assigned to those roles.

//This is demonstrated by the following example:

//* User John is assigned to Role A. Role A grants him to create a new child Node in a parent Node.
//* User Mary is assigned to Role B. Role B grants her to also create a new child //Node in the same parent Node.
//* When John creates a new Node the permission system identifies Role B as a role that would also be able to create the object. Therefore CRUD permissions are assigned in between Role A and B and the newly created object.

Following, we go through all Gentics Mesh objects that can be subject to permissions.

==== How to grant Permissions on Users

In order to grant permission on individual or all users, one need to specify the path to be either ```/users/:uuid``` or ```/users```, respectively.

Applying permissions on ```/users``` recursively will affect all users to which the requesting user has read access.

//COMMENT: This info is interesting for mesh developers, not mesh API users.
// However, applying permissions on ```/users/:uuid``` recursively will have no effect on referenced elements such as node references.

TIP: If you need to grant permission on users of a specific group, please use the ```/groups/:uuid``` element path together with property ```recursively```.

===== Example
The following example shows how to grant the ```Editor Role``` role the permission to read all users. Since this is an operation to be performed on a set of users, the element path ```/users``` needs to be used together with property ```recursive=true```.

NOTE: Links used in the example require prior authentication with user admin (credentials: admin/admin). Please refer to the link:/docs/references/#_authentication[authentication] section to learn about the different authentication mechanisms provided by Gentics Mesh. The https://insomnia.rest/[Insomnia] REST client can be used to build and invoke requests from your browser to Gentics Mesh.

You can query the updated permissions with user ```admin```.

===== Role permissions
All possible role permissions on users are summarized in the following table.

[caption=]
.Role permissions on individual users and set of users
[options="header"]
|======
| Role permission       | Element path        | Permission  | Recursive
| Can create new users  | ```/users```        | Create      | false
| Can read all users    | ```/users```        | Read        | true
| Can update all users  | ```/users```        | Update      | true
| Can delete all users  | ```/users```        | Delete      | true
| Can read user         | ```/users/:uuid```  | Read        | false
| Can update user       | ```/users/:uuid```  | Update      | false
| Can delete user       | ```/users/:uuid```  | Delete      | false
|======

==== How to grant Permissions on Groups

Permissions on a single or multiple groups are applied via ```/groups/:uuid``` path and ```/groups``` path respectively.

* Granting permissions on ```/groups``` recursively will affect all groups to which the requesting user has read access.
* Granting permissions  on ```/groups/:uuid``` recursively will affect users of the group to which the requesting user has read access..

===== Example
The following example shows how to grant the ```Editor Role``` role the permission to read a specific group (i.e. ```Client Group```) and its users (i.e. ```webclient```). This operation needs to be applied recursively (i.e., ```recursive=true```), otherwise ```read``` permissions would be granted to the group, only.


NOTE: Links used in the example require prior authentication with user admin (credentials: admin/admin). Please refer to the link:/docs/references/#_authentication[authentication] section to learn about the different authentication mechanisms provided by Gentics Mesh. The https://insomnia.rest/[Insomnia] REST client can be used to build and invoke requests from your browser to Gentics Mesh.

You can query the updated permissions with user ```admin```.

===== Role permissions
All possible role permissions on groups are summarized in the following table.

[caption=]
.Role permissions on a specific group and multiple groups
[options="header"]
|======
| Role permission        | Element path         | Permission  | Recursive
| Can create new groups  | ```/groups```        | Create      | false
| Can read all groups    | ```/groups```        | Read        | true
| Can update all groups  | ```/groups```        | Update      | true
| Can delete all groups  | ```/groups```        | Delete      | true
| Can read group         | ```/groups/:uuid```  | Read        | false
| Can update group       | ```/groups/:uuid```  | Update      | false
| Can delete group       | ```/groups/:uuid```  | Delete      | false
| Can read group and its users   | ```/groups/:uuid```| Read        | true
| Can update group and its users | ```/groups/:uuid```| Update      | true
| Can delete group and its users | ```/groups/:uuid```| Delete      | true
|======

==== How to Grant Permissions on Roles

By granting permissions on roles, you effectively grant users the right to change permissions of other users.

* Permissions on a single or multiple roles are applied via ```/roles/:uuid``` path and ```/roles``` path respectively.
* Granting permissions on ```/roles``` recursively will affect all roles to which the requesting user has read access.

===== Example
The following example shows how to grant the ```Editor Role``` role permissions to create new roles and subsequently manage them (i.e., ```read```, ```update```, ```delete```) but no access to existing roles.

NOTE: Links used in the example require prior authentication with user admin (credentials: admin/admin). Please refer to the link:/docs/references/#_authentication[authentication] section to learn about the different authentication mechanisms provided by Gentics Mesh. The https://insomnia.rest/[Insomnia] REST client can be used to build and invoke requests from your browser to Gentics Mesh.

You can query the updated permissions with user ```admin```.

===== Role permissions
All possible role permissions on roles are summarized in the following table.

[caption=]
.Role permissions on a specific role and multiple roles
[options="header"]
|======
| Role permission       | Element path        | Permission  | Recursive
| Can create new roles  | ```/roles```        | Create      | false
| Can read all roles    | ```/roles```        | Read        | true
| Can update all roles  | ```/roles```        | Update      | true
| Can delete all roles  | ```/roles```        | Delete      | true
| Can read role         | ```/roles/:uuid```  | Read        | false
| Can update role       | ```/roles/:uuid```  | Update      | false
| Can delete role       | ```/roles/:uuid```  | Delete      | false
|======

==== How to Grant Permissions on Schemas

Permissions on a single or multiple schemas are applied via ```/schemas/:uuid``` path and ```/schemas``` path respectively.

* Granting permissions on ```/schemas``` recursively will affect all schemas to which the requesting user has read access.
* Read permissions on a schema are needed for creating nodes based on that schema.

[caption=]
.Role permissions on a specific schema and multiple schemas
[options="header"]
|======
| Role permission                           | Element path          | Permission  | Recursive
| Can create new schemas                    | ```/schemas```        | Create      | false
| Can read all schemas, and create nodes    | ```/schemas```        | Read        | true
| Can update all schemas                    | ```/schemas```        | Update      | true
| Can delete all schemas                    | ```/schemas```        | Delete      | true
| Can read schema, and create nodes         | ```/schemas/:uuid```  | Read        | false
| Can update schema                         | ```/schemas/:uuid```  | Update      | false
| Can delete schema                         | ```/schemas/:uuid```  | Delete      | false
|======

==== How to Grant Permissions on Microschemas

Permissions on a single or multiple microschemas are applied via ```/microschemas/:uuid``` path and ```/microschemas``` path respectively.

* Granting permissions on ```/microschemas``` recursively will affect all microschemas to which the requesting user has read access.
* Read permissions on a microschemaModel are needed for creating, reading, updating, and deleting micronodes based on that schema.

[caption=]
.Role permissions on a specific microschemaModel and multiple microschemas
[options="header"]
|======
| Role permission                                     | Element path               | Permission  | Recursive
| Can create new microschemas                         | ```/microschemas```        | Create      | false
| Can read all microschemas, and create micronodes    | ```/microschemas```        | Read        | true
| Can update all microschemas                         | ```/microschemas```        | Update      | true
| Can delete all microschemas                         | ```/microschemas```        | Delete      | true
| Can read microschemas, and create micronodes        | ```/microschemas/:uuid```  | Read        | false
| Can update microschemas                             | ```/microschemas/:uuid```  | Update      | false
| Can delete microschemas                             | ```/microschemas/:uuid```  | Delete      | false
|======


==== How to Grant Permissions on Projects

Permissions on a single or multiple projects are applied via ```/projects/:uuid``` path and ```/projects``` path respectively.

* Granting permissions on ```/projects/:uuid``` will also affect sub elements, i.e., used schemas, microschemas, tagfamilies & tags, nodes & sub nodes of the project.
* Granting permissions on ```/projects``` recursively will affect all projects and their sub elements to which the requesting user has read access.

[caption=]
.Role permissions on a specific project and multiple projects
[options="header"]
|======
| Role permission                                      | Element path           | Permission     | Recursive
| Can create new project                               | ```/projects```        | Create         | false
| Can read all projects and sub elements               | ```/projects```        | Read           | true
| Can update all projects and sub elements             | ```/projects```        | Update         | true
| Can delete all projects and sub elements             | ```/projects```        | Delete         | true
| Can read published nodes and subnodes of all project | ```/projects```        | Read Published | true
| Can un/publish nodes and subnodes of all project     | ```/projects```        | Publish        | true
| Can read project and sub elements                    | ```/projects/:uuid```  | Read           | true
| Can update project and sub elements                  | ```/projects/:uuid```  | Update         | true
| Can delete project and sub elements                  | ```/projects/:uuid```  | Delete         | true
| Can read published nodes and subnodes of project     | ```/projects/:uuid```  | Read Published | true
| Can un/publish nodes and subnodes of project         | ```/projects/:uuid```  | Publish        | true
|======

==== How to Grant Permissions on Tag Families

In order to grant permission on tag families the ```/:projectName/tagFamilies``` path can be used.

* Granting permissions on ```/:projectName/tagFamilies/:uuid```  together with property ```recursive=true``` allows setting permissions for tags of a tag family.
* Granting permissions on ```/:projectName/tagFamilies```  together with property ```recursive=true``` allows setting permissions for all tag families and their tags to which the requesting user has read access.

[caption=]
.Role permissions on tag families
[options="header"]
|======
| Role permission                                      | Element path                           | Permission     | Recursive
| Can create new tag families                          | ```/:projectName/tagFamilies```        | Create         | false
| Can create new tag families and tags for tagFamilies | ```/:projectName/tagFamilies```        | Create         | true
| Can read all tag families and tags                   | ```/:projectName/tagFamilies```        | Read           | true
| Can update all tag families and tags                 | ```/:projectName/tagFamilies```        | Update         | true
| Can delete all tag families and tags                 | ```/:projectName/tagFamilies```        | Delete         | true
| Can create tags in tag family                        | ```/:projectName/tagFamilies/:uuid```  | Create         | false
| Can read tag family                                  | ```/:projectName/tagFamilies/:uuid```  | Read           | false
| Can update tag family                                | ```/:projectName/tagFamilies/:uuid```  | Update         | false
| Can delete tag family                                | ```/:projectName/tagFamilies/:uuid```  | Delete         | false
| Can read tag family and tags                         | ```/:projectName/tagFamilies/:uuid```  | Read           | true
| Can update tag family and tags                       | ```/:projectName/tagFamilies/:uuid```  | Update         | true
| Can delete tag family and tags                       | ```/:projectName/tagFamilies/:uuid```  | Delete         | true
|======

==== How to Grant Permissions on Tags

In order to grant permission on tags the ```/:projectName/tagFamilies/:uuid/tags``` and ```/:projectName/tagFamilies/:uuid/tags/:uuid``` paths can be used.

* Currently, using path ```/:projectName/tagFamilies/:uuid/tags``` works same as using path ```/:projectName/tagFamilies/:uuid```
* Granting permissions on ```/:projectName/tagFamilies/:uuid/tags``` together with property ```recursive=true``` allows setting permissions for tags of a tag family, otherwise the property has no effect.

[caption=]
.Role permissions on tag families
[options="header"]
|======
| Role permission                | Element path                                     | Permission     | Recursive
| Can create tags in tag family  | ```/:projectName/tagFamilies/:uuid/tags```       | Create         | false
| Can read tag family            | ```/:projectName/tagFamilies/:uuid/tags```       | Read           | false
| Can update tag family          | ```/:projectName/tagFamilies/:uuid/tags```       | Update         | false
| Can delete tag family          | ```/:projectName/tagFamilies/:uuid/tags```       | Delete         | false
| Can read tag family and tags   | ```/:projectName/tagFamilies/:uuid/tags```       | Read           | true
| Can update tag family and tags | ```/:projectName/tagFamilies/:uuid/tags```       | Update         | true
| Can delete tag family and tags | ```/:projectName/tagFamilies/:uuid/tags```       | Delete         | true
| Can read tag                   | ```/:projectName/tagFamilies/:uuid/tags/:uuid``` | Read           | false
| Can update tag                 | ```/:projectName/tagFamilies/:uuid/tags/:uuid``` | Update         | false
| Can delete tag                 | ```/:projectName/tagFamilies/:uuid/tags/:uuid``` | Delete         | false
|======

==== How to Grant Permissions on Nodes

Permissions on a single or multiple nodes are applied via ```/:projectName/nodes``` and ```/:projectName/nodes/:uuid``` path:

* ```/:projectName/nodes/:uuid``` is used to grant permissions on single nodes.
* ```/:projectName/nodes``` together with property ```recursive=true``` can be used to quickly grant permissions on all node of the project to which the requesting user has read access.
* In order to grant permissions on sub trees of the content tree ```/:projectName/nodes/:uuid``` together with property ```recursive=true``` is to be used.

[caption=]
.Role permissions on nodes
[options="header"]
|======
| Role permission                                           | Element path                    | Permission    | Recursive
| Can create new sub nodes in all nodes of the project      | ```/:projectName/nodes```       | Create        | true
| Can read all project nodes (and all node versions)        | ```/:projectName/nodes```       | Read          | true
| Can update all nodes of the project                       | ```/:projectName/nodes```       | Update        | true
| Can delete all nodes of the project                       | ```/:projectName/nodes```       | Delete        | true
| Can read the published version of all project nodes       | ```/:projectName/nodes```       | ReadPublished | true
| Can publish/unpublish all nodes of the project            | ```/:projectName/nodes```       | Publish       | true
| Can create new sub nodes in specified node                | ```/:projectName/nodes/:uuid``` | Create        | false
| Can read specified node                                   | ```/:projectName/nodes/:uuid``` | Read          | false
| Can update specified node                                 | ```/:projectName/nodes/:uuid``` | Update        | false
| Can delete specified node                                 | ```/:projectName/nodes/:uuid``` | Delete        | false
| Can read the published version specified node             | ```/:projectName/nodes/:uuid``` | ReadPublished | false
| Can publish/unpublish specified node                      | ```/:projectName/nodes/:uuid``` | Publish       | false
| Can create new sub nodes in specified node & sub nodes    | ```/:projectName/nodes/:uuid``` | Create        | true
| Can read specified node & sub nodes                       | ```/:projectName/nodes/:uuid``` | Read          | true
| Can update specified node & sub nodes                     | ```/:projectName/nodes/:uuid``` | Update        | true
| Can delete specified node & sub nodes                     | ```/:projectName/nodes/:uuid``` | Delete        | true
| Can read the published version specified node & sub nodes | ```/:projectName/nodes/:uuid``` | ReadPublished | true
| Can publish/unpublish specified node & sub nodes          | ```/:projectName/nodes/:uuid``` | Publish       | true

|======


==== How to Grant Permissions on project branches

Permissions on a single or multiple branches are applied via ```{apiLatest}/:projectName/branches/:uuid``` path and ```{apiLatest}/:projectName/branches``` path respectively.

NOTE: Branches can not be deleted. Hence, permissions for deleting do not apply.

[caption=]
.Role permissions on a specific branch and multiple branches
[options="header"]
|======
| Role permission                     | Element path                               | Permission     | Recursive
| Can create new branch               | ```{apiLatest}/:projectName/branches```        | Create         | false
| Can read all branches               | ```{apiLatest}/:projectName/branches```        | Read           | true
| Can update all branches             | ```{apiLatest}/:projectName/branches```        | Update         | true
| Can read the branch                 | ```{apiLatest}/:projectName/branches/:uuid```  | Read           | false
| Can update the branch               | ```{apiLatest}/:projectName/branches/:uuid```  | Update         | false
|======

[[versioning]]
== Versioning

In order to understand the concept of versioning in Gentics Mesh it is important to remember that nodes are containers for language specific contents (see <<multilanguage, Multi-Language>>). The content of a node contains the fields and thus stores all the content.

NOTE: Versioning within Gentics Mesh only applies to *contents* and their referenced fields. Other elements such as users, groups, roles, permissions are not versioned.

Various content management tasks will have different effects for versioning in Gentics Mesh. Some of them create versions, others don't. Following, we go through all of these actions which involve versioning.

=== Node Creation

Once a node has been created the initial version 0.1 will be assigned to its content.

=== Node Updates

Updating a node's content may create a minor version 0.2 of that content if changes have been detected within the posted request fields.

*No Locks:*

It is not required to handle locks in Gentics Mesh. Instead it is required to specify the version in the update request which identifies the version on which the update request was based upon.

*Conflict detection:*

Gentics Mesh will check whether new versions have been created in the meanwhile. Long running edit operations or multiple concurrent editors may create additional versions.

The detected changes will be compared automatically in order to determine whether the current update request causes a conflict with a newer edit request.
Gentics Mesh will return a response which contains information about the conflict in those cases. Other update operations which do not cause a conflict will be stored and the changed fields will be updated.

The latest version which was created using an update request is called the ```draft``` version. Only a single draft version per content exists.

=== Publishing Nodes

Node contents can be published and taken offline. This is particularly useful if you want to first work on a draft, then review it and publish it at a later point in time.

Publishing requires a ```POST``` request on the ```{apiLatest}/:projectName/nodes/:uuid/published``` endpoint, which will publish all contents of the node.
It is also possible to just publish specific contents with dedicated ```POST``` requests on ```{apiLatest}/:projectName/nodes/:uuid/languages/:languageTag/published```.

Gentics Mesh will automatically create a new major version when publishing a node language variant (e.g.: 1.0, 2.0). The ```draft``` reference will also be updated to point to the major version, e.g. 1.0.

Furthermore, it is possible to retrieve information about the published status via a ```GET``` request on ```{apiLatest}/:/nodes/:uuid/published```.

NOTE: Publishing node contents requires the user to be assigned to a group with a role which provides the ```publish``` permission.

[source,json,csubs=attributes]
----
{
  "availableLanguages" : {
    "de" : {
      "published" : false,
      "version" : "0.4"
    },
    "en" : {
      "published" : true,
      "version" : "3.0",
      "publisher" : {
        "firstName" : "Joe",
        "lastName" : "Doe",
        "uuid" : "589319933be24ec79319933be24ec7fe"
      },
      "publishDate" : "2018-11-20T20:12:01.084Z"
    },
    "fr" : {
      "published" : false,
      "version" : "5.2"
    }
  }
}
----

NOTE: It is not possible to publish a specific version. Publish always affects the latest draft version of the language variant.

=== Taking Nodes Offline

Similarly to publishing, the contents of a node can be taken offline via a ```DELETE``` request on ```{apiLatest}/:projectName/nodes/:uuid/published```.
E.g., taking a specific node language variant with version 1.0 offline using ```DELETE {apiLatest}/:projectName/nodes/:uuid/languages/:languageTag/published``` will just change the node's publish state. Version 1.0 will still be available.

NOTE: Taking node contents offline requires the user have ```publish``` permissions on the node.

===  Reading Nodes

It is possible to fetch older versions by specifying the ```?version``` query parameter. Similarly, the published version of a node language variant can also be loaded using the parameter ```?version=published``` or the draft version via ```?version=draft```.

IMPORTANT: Gentics Mesh by default returns the ```draft``` version of nodes. This means for supporting the ```anonymous``` user and public content, you need to add the ```?version=published``` query parameter on all requests for nodes to avoid _"Missing permissions on object"_ errors.

NOTE: Reading published nodes requires the user to be assigned to a role which grants the ```readPublished``` permission.

=== Listing versions

Versions of a node can be listed via the ```{apiLatest}/:projectName/nodes/:uuid/versions``` endpoint.
"versions" : { "de" : [ { "creator" : { "firstName" : "Joe", "lastName" : "Doe", "uuid" : "307cf98b66424db5bcf98b66424db5aa" }, "created" : "2019-05-22T19:04:10Z", "version" : "2.0", "draft" : true, "published" : true, "branchRoot" : false } … } ] }
A version can be used as a `draft` version. This version can also be referenced as a `published` version when published. The `branchRoot` flag indicates whether the version is being referenced as root version in a branch. All these three different kind of versions are not purgeable. Versions which have been made in between can be purged.

NOTE: Versions are language specific. This means that each language of a node has its dedicated version history.

[[auto-purge]]
=== Auto Purge

The auto purge mechanism can be used to control the versioning mechanism. The mechanism will automatically purge the previously used version when a new version gets created. This way the version history of a node can be kept small. This will (depending on a chosen RDBMS) reduce database usage and boosts performance. Actions such as _update node_, _upload binary_, _publish node_, _take node offline_ create versions. The auto purge feature can be controlled by a global default setting which can be fine tuned on a per-schema level.

[caption=]
.Auto Purge settings
[options="header"]
|======
| Defaut setting | Schema setting | Auto Purge
| true           | null           | Enabled
| true           | false          | Disabled
| false          | true           | Enabled
| false          | false          | Disabled
|======

NOTE: Enabling auto purge mechanism will not stop version numbers to increase. Instead the mechanism will automatically purge the previously used version (if possible).

NOTE: Setting the auto purge flag in a schema will not automatically purge any version. The versions will only be purged when content gets modified.

==== Default Setting

The global `autoPurge` flag from the `mesh.yml` configuration file will be used for schemas which don't have `autoPurge` property set. Setting the `autoPurge` property will thus also allow to override the default configuration in the `mesh.yml`.

.mesh.yml
[source,yaml]
----
content:
  autoPurge: true
----

==== Schema Setting

Versioning can be controlled on a *per-schema* basis. The `autoPurge` property within the schema controls whether additional versions for a content will be kept.

The default behaviour can be configured via the environment variable `MESH_CONTENT_AUTO_PURGE` or the config file.

=== Purging versions

The `POST {apiLatest}/projects/:projectUuid/maintenance/purge` endpoint can be used to purge older versions from the system.

When invoked a new job will be triggered which purges all possible content versions from the given project.

The `?before` query parameter can be used to control what versions should be purged.

The call `POST {apiLatest}/projects/:projectUuid/maintenance/purge?before=2019-04-20T18:00Z` will thus only purge versions which are older than the given date. Omitting the parameter will purge all versions.

Draft and publish versions will not be purged since they are still required. Additionally when the initial version of a node can also not be purged since it is bound to the _Branch_ of the node. Gentics Mesh requires this version to keep track of the branch starting point. The version lists endpoint will mark those versions using the `branchRoot` flag.

The purge operation requires _admin_ role and _delete_ permissions on the project to be executed.

NOTE: The version purge mechanism works independently from the auto purge mechanism.

== Content Branches

So far we learned that node contents can be versioned and published. Additionally Gentics Mesh versioning provides a powerful concept we call `Branches`. A project branch is very similar to branches in a versioning control system like Git or similar systems.

Branches can be used to restructure your nodes and change the contents within a specific branch without affecting a different branch which provides a different structure/content.

Structural references for nodes always contain branch information. This applies to parent/child relationship or taggings, publish states of nodes. This way branches are completely isolated from each other.

NOTE: It is currently not possible to migrate from one branch to another. Nodes of branches can't be automatically merged to other branches.

Typical usecases are:

* Updating an existing application installation which uses Gentics Mesh to a new version. The new application version requires new schema versions.
  By creating a branch and migrating the nodes to the new branch (new schema versions), it is possible to serve content for both application versions.
  Each application versions chooses the correct branch for getting nodes.

* Schema versions must be assigned to the branch.
  Each project can have multiple branches.
  An initial branch will automatically be created when creating a project.

All operations to nodes can be scoped to a specific branch by adding the ```?branch=name``` query parameter. If omitted the latest branch will be used to execute the operation.

TIP: Implementations which use mesh should always reference a specific branch. Otherwise the document structure could change without the implementation being aware of these changes.

=== Creating a project branch

A branch requires an unique name. Existing nodes within the project will automatically be migrated into the branch.
Please note the started *node migration* will be processed asynchronously and thus not all nodes may be directly accessible within the scope of the branch.

This migration is different from a schema version migration. The branch node migration just takes care of making all nodes from the previous branch available in the newly created branch.
Unlike the schema migration the node migration will not create new language variant versions.

You can use the eventbus bridge or the dedicated ```{apiLatest}/admin/status/migrations``` endpoint to query the migration status.
The ```migrated``` JSON property within the branch response also indicates whether the node migration has been completed.

Note: Migrated nodes will still have the same _uuid_ as before.

=== Updating a project branch

A branch can be _renamed_ and new schema/microschemaModel versions can be _assigned_ to it.

Renaming is useful if you want to change your development branch to be the current production branch.

Assigning schema versions to the branch via a ```PUT``` request to ```{apiLatest}/:projectName/branches/:uuid/schemas``` will automatically trigger a schema migration of the affected nodes contents within the branch.

[source,json]
----
{
  "schemas" : [ {
    "name" : "content",
    "uuid" : "39f69bee0baa415eb69bee0baa115e82",
    "version" : "1.0"
  }, {
    "name" : "folder",
    "uuid" : "39f69bee0baa415eb69bee0baa115e82",
    "version" : "1.0"
  }, {
    "name" : "binary-data",
    "uuid" : "39f69bee0baa415eb69bee0baa115e82",
    "version" : "1.0"
  } ]
}
----

It is also possible to assign microschemas via a ```PUT``` request to ```{apiLatest}/:projectName/branches/:uuid/microschemas``` to the branch.

[source,json]
----
{
  "microschemas" : [ {
    "name" : "vcard",
    "uuid" : "2715307deafc4ecc95307deafccecc10",
    "version" : "2.0"
  }, {
    "name" : "geolocation",
    "uuid" : "2715307deafc4ecc95307deafccecc10",
    "version" : "1.0"
  } ]
}
----

All nodes which reference the branch via the updated schema version will automatically be migrated to use the newer schema version.
Please note the started *schema migration* will be processed asynchronously and thus not all node contents may be directly accessible within the scope of the branch.

The migration will create new versions for the affected node contents.

NOTE: It is note worthy that updating a schema and thus creating new schema version will not automatically affect the branch. Each schema update created a new schema version. This new version must first be assigned to the branch.

=== Deleting a project branch

At the moment it is not possible to delete a branch.

=== Moving Nodes

Branches enable Gentics Mesh to setup multiple content project tree structures.
Moving nodes can be scoped to a specific branch using the ```?branch``` query parameter.
The project's initial branch will be used to execute the move operation if no branch has been selected.

=== Tagging Nodes

The tag operation is also scoped to a specific branch. This way new tags can be assigned to your nodes for a specific branch without affecting the taggings of nodes within an older branch.

NOTE: Tags and tag families are not versioned. Deleting a tag will remove the tag from all nodes that previously referenced this tag.

NOTE: Taggings to nodes are not versioned.

=== Deleting Nodes

Deleting nodes is also branch specific. Deleting a node via ```DELETE``` to ```{apiLatest}/:projectName/node/:uuid?branch=winter2016``` will delete the node and all its sub nodes from the _winter2016_ branch.
The node will be completely removed from the system if no more contents are referenced within any branch.

It is also possible to just delete a specific language variant via ```DELETE``` to ```{apiLatest}/:projectName/node/:uuid/languages/en?branch=winter2016``` from branch _winter2016_.

=== Updating Nodes

Branches are completely isolated from each other as explained earlier. This also applies to a node's language variant versions.

Example:

* Create project branch _summer2016_
* Create node with language variant _de_ at version _1.0_ in branch _summer2016_
* Create project branch _winter2016_
* Update previously created node in branch _summer2016_ and thus create version _1.1_

Branch _summer2016_ will reference node language variant 1.1 and _winter2016_ will still reference version 1.0 since the _winter2016_ branch was created at the specific point of time in which the language variant in branch _summer2016_ was still at version _1.0_.

NOTE: It is currently not possible to migrate _1.1_ from _summer2016_ to _winter2016_.

Additionally creating new nodes in _summer2016_ will not be available in branch _winter2016_.

=== Permissions

NOTE: Permissions are not branch specific.

== Preview Handling

The Gentics Mesh User Interface provides a preview button when editing nodes. A post request to a configureable url is being dispatched when the button is triggered.
The post request will contain the node JSON data of the current editing state. This way a preview page can be easily rendered by custom frontend implementations.

== Password Recovery

A user who lost his password is able to recover it using a reset token. This token, typically, is issued by a user or service having permissions to create new users.
The ```{apiLatest}/users/:userUuid/reset_token``` endpoint will return a token code which then can be passed along to an email service sending a recovery email to the user including named token.

NOTE: A token is valid for 30 minutes and will be invalidated once it has been used.

The user can use this token to update his user record by issuing a POST request to the ```{apiLatest}/users/:userUuid?token=TOKENCODE``` endpoint. E.g., this can be done by presenting the user a form for updating his password. This works even if the user is not authenticated.

== Schema & Microschema Migration

Gentics Mesh provides a changelog like system in order to apply and keep track of schema changes. A schema change may be a single change that adds a new field to the schema or a change which updates the schema properties.

Gentics Mesh supports the following change operations:

=== Operation: addfield

[options="header"]
|======
| Properties  | Description
| after       | Name of the field after which the new field should be inserted
| field       | Name of the field that should be added
| type        | Type of the field
| listType    | Optional list type
|======


[source,json]
----
{
  "operation" : "ADDFIELD",
  "properties" : {
    "field" : "fieldToBeAdded",
    "elasticsearch" : "{\"settings\":\"value\"}",
    "label" : "Field Label Value",
    "after" : "firstField",
    "type" : "list",
    "listType" : "html"
  }
}
----


=== Operation: removefield

[options="header"]
|======
| Properties  | Description
| field       | Name of the field to be removed
|======

[source,json]
----
{
  "operation" : "REMOVEFIELD",
  "properties" : {
    "field" : "fieldToBeRemoved"
  }
}
----


=== Operation: changefieldtype

[options="header"]
|======
| Properties  | Description
| field       | Name of the field to be modified
| type        | New field type
| listType    | (Only applies for lists) New list type
|======

[source,json]
----
{
  "operation" : "CHANGEFIELDTYPE",
  "properties" : {
    "field" : "fieldToBeChanged",
    "type" : "html"
  }
}
----

=== Operation: updatefield

[options="header"]
|======
| Properties       | Description
| field            | Field to be updated
| label            | New field label
|======

[source,json]
----
{
  "operation" : "UPDATEFIELD",
  "properties" : {
    "field" : "fieldToBeUpdated",
    "name" : "newName"
  }
}
----

=== Operation: updateschema

[options="header"]
|======
| Properties       | Description
| description      | New schema description
| order            | Array of strings that contains the field order
| displayFieldname | New displayFieldname value of the schema
| segmentFieldname | New segmentFieldname value of the schema
| container        | New container flag of the schema
|======

[source,json]
----
{
  "operation" : "UPDATESCHEMA",
  "properties" : {
    "container" : "true",
    "segmentFieldname" : "newSegmentField",
    "displayFieldname" : "newSegmentField",
    "description" : "new description",
    "label" : "new label"
  }
}
----

=== Operation: updatemicroschema

[options="header"]
|======
| Properties       | Description
| description      | New microschemaModel description
|======

[source,json]
----
{
  "operation" : "UPDATEMICROSCHEMA",
  "properties" : {
    "description" : "new description",
    "label" : "new label"
  }
}
----

Each change may also provide a migration script. The migration script can be used to modify nodes that were affected by the migration.

Typical usecases for migration scripts are for example dynamic field removal or even custom reformatting of field data.
It is also possible to split a single field value into values for two new fields.

The ```{apiLatest}/schemas/:uuid/diff``` and ```{apiLatest}/microschemas/:uuid/diff``` endpoints can be used to generate a list of changes by comparing the stored and posted schema.

This list of changes can be modified and posted to ```{apiLatest}/schemas/:uuid/changes``` for schemas or ```{apiLatest}/microschemas/:uuid/changes``` for microschemas.
The posted list of changes will be validated and stored when valid. A schema migration process will be started which runs in the background.

The https://github.com/sockjs[SockJS] compliant ```{apiLatest}/eventbus``` endpoint can be used to register to migration specific messages.

Additionally to websocket it is possible to query whether a migration is running via the ```{apiLatest}/admin/status/migrations``` endpoint.

Sending a schema to ```{apiLatest}/schemas:uuid``` using the ```PUT``` method will conveniently combine the diff generation and invocation of the schema migration.

Please note that by default conflicting data will be *removed* and this action can only be avoided by specifying a custom migration script.

=== Custom Migration Scripts

Sometimes it is desired to overwrite the default migration behaviour.

The following migration script converts the number value from field ```node.fields[fieldname]``` into a _ISO-8601_ date string which is then stored within the ```node.fields[fieldname]``` field.

[source,javascript]
----
function migrate(node, fieldname, convert) {
    node.fields[fieldname] = new Date(new Date(node.fields[fieldname]).getTime() + 864000).toISOString();
    return node;
}
----

Migration scripts also allow you to split up a field value into two different fields.

[source,javascript]
----
function migrate(node, fieldname, convert) {
    node.fields["fieldA"] = "First field set";
    node.fields["fieldB"] = "Second field set";
    return node;
}
----

The provided converter can be used to convert in between field types. This converter will be used if no custom migration script was specified.


[source,javascript]
----
function migrate(node, fieldname, convert) {
    var stringValue = convert.toString(node.fields[fieldname]);

    // It is important to use the Java.from method to convert the java list object into a number array.
    var numberArray    = Java.from(convert.toNumberList(node.fields[fieldname]));
    var micronodeArray = Java.from(convert.toMicronodeList(node.fields[fieldname]));
    var dateArray      = Java.from(convert.toDateList(node.fields[fieldname]));
    var booleanArray   = Java.from(convert.toBooleanList(node.fields[fieldname]));

    var numberValue    = convert.toNumber(node.fields[fieldname]);
    var nodeValue      = convert.toNode(node.fields[fieldname]);
    var micronodeValue = convert.toMicronode(node.fields[fieldname]);
    var dateValue      = convert.toDate(node.fields[fieldname]);
    var booleanValue   = convert.toBoolean(node.fields[fieldname]);
    var binaryValue    = convert.toBinary(node.fields[fieldname]);

    // Delete the field
    delete node.fields[fieldname];
    return node;
}
----


Finally the changes can be applied by sending the request to ```{apiLatest}/schemas/:uuid/changes```.

[source,json,subs=attributes]
----
{
  "changes" : [ {
    "operation" : "ADDFIELD",
    "properties" : {
      "field" : "listFieldToBeAddedField",
      "elasticsearch" : "{\"key\":\"value\"}",
      "label" : "Field Label Value",
      "type" : "list",
      "listType" : "html"
    }
  }, {
    "operation" : "CHANGEFIELDTYPE",
    "properties" : {
      "field" : "fieldToBeUpdated",
      "type" : "string"
    }
  }, {
    "operation" : "REMOVEFIELD",
    "properties" : {
      "field" : "fieldToBeRemoved"
    }
  }, {
    "operation" : "UPDATEFIELD",
    "properties" : {
      "field" : "fieldToBeUpdated",
      "displayFieldname" : "newDisplayField",
      "label" : "newLabel"
    }
  }, {
    "operation" : "UPDATESCHEMA",
    "properties" : { }
  } ]
}
----

== Executing migrations

Migrations can potentially affect a huge amount of nodes depending on the size of your project. As such the migration could take some time to complete.
This is why we designed migrations in ways that they can be executed asynchronously.
Various operations in Gentics Mesh (e.g. Schema update, assigning versions to branches, creating branches) may trigger migrations.
Before the migration is being executed a job is added to the job queue. You can view the queue via the `{apiLatest}/admin/jobs` endpoint.
These jobs will be processed and execute the actual migration.

By default updating a schema will create a new schema version and the nodes will be migrated to that new version.
If you want to defer this operation you can set the `updateAssignedBranches` query parameter to false when updating a schema/microschemaModel.
This leads to a new schema version being created but the version would not be linked to your current branch and no migration would be invoked.

Once a job has been queued and a migration has been invoked the status can be checked via the `{apiLatest}/admin/status/migrations` endpoint.

A job will only be removed from the job list when the job completed without any error. Erroneous jobs will stay in the job list.
This way interrupted migrations can be picked up and executed once again.

Intermediate errors may cause a job to fail. In those cases it is possible to reset the error flag of a job by executing `DELETE {apiLatest}/admin/jobs/:jobUuid/error`.
The job can run again once the error flag has been cleared. It is possible to invoke `POST {apiLatest}/admin/processJobs` to trigger a manual event which will start the job processing.

Jobs which keep failing can be permanently removed from the job queue via the `DELETE {apiLatest}/admin/jobs/:jobUuid` endpoint.
Please note that it is only possible to remove jobs which have failed. Jobs which don't fail will automatically be removed from the list.

== Clustering

Clustering is described in detail in our dedicated link:/docs/clustering/[clustering documentation].

== HTTP/2 serving

Mesh supports serving over HTTP/2 out of the box.